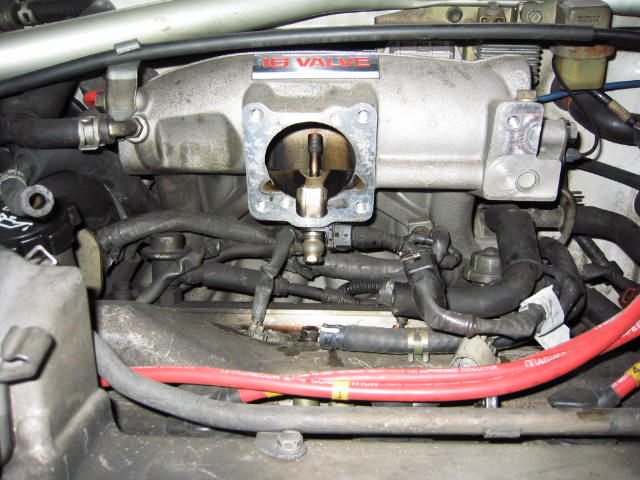
| Disconnect battery. Drain the intercooler coolant down into a receptacle and keep for later, remove intercooler. | |
| Remove throttle body. Label the connection to the ISC and Throttle Position Sensor. Pull off the coolant pipes located at either side of the ISC. Completely remove the air feed pipe to the ISC. Open the throttle fully by hand and disconnect the accelerator cable and pull free the rubber grommet locating the cable to the throttle body. Unclip the remainder of the accelerator cable and tuck it away somewhere out of the way. | |
Remove and label:
|
|
 |
Remove fuel rail. Best way is to remove fuel rail return pipe form rail (the hose with the clip) and blank this off. Undo the pressure hose at the fuel rail (hose from the fuel filter) and remove the pulsation damper, (flying saucer shaped thing) - taking care to keep hold of the bolt and two copper washers. Remove fuel pipe to fifth injector - undo bolt and keep two copper washers. Remove 5th injector cable - label it!. Remove 5th injector from manifold - 2 bolts located either side. Label and remove the 4 leads to the injectors. . Next undo the three securing bolts to the head. Gradually loosen these off in equal steps going from the ends inwards, so as not to warp the rail. Remove 3 bolts and note orientation of spacers - plastic portion up. In true famous manual style "simply" pull fuel rail free". It will 'just' come out, fuel rail plus injectors. Watch out for the rubber grommet attached to the end of each injector. |
| Undo large cylindrical bright yellow FPR connector, remove oil pressure switch connector - wire disappears through the centre of the manifold down to the centre rear of the block - push on plastic connector that has a plastic push down clip on the side - awkward to release.. | |
| Undo 3 bolts securing the solid air line arrangement to the rear of the manifold, this also releases an earth connection. 2 bolts on right hand side, (rhs), and 1 on left hand side, (lhs). | |
| Also on the rear of the manifold are two struts which support the manifold. Undo the bolt for each of these and push the struts to the side out of the way. If at this stage you are thinking bugger, I'm gonna have to undo the bolts at the bottom of the stays then think again coz they are bordering on impossible to undo due to their nightmare location. I did this with the struts in place and the rear bolts done up! | |
| Looking closely at the manifold/head there are 7 nuts and bolts. You will be relieved that most are easy to remove, but a couple are a nightmare. Undo them from outside ends to the centre in equal steps to avoid warpage. To help with the nut adjacent to the power steering pump undo and remove the engine lifting hook. All the nuts and bolts can all be reached - you just need long arms. | |
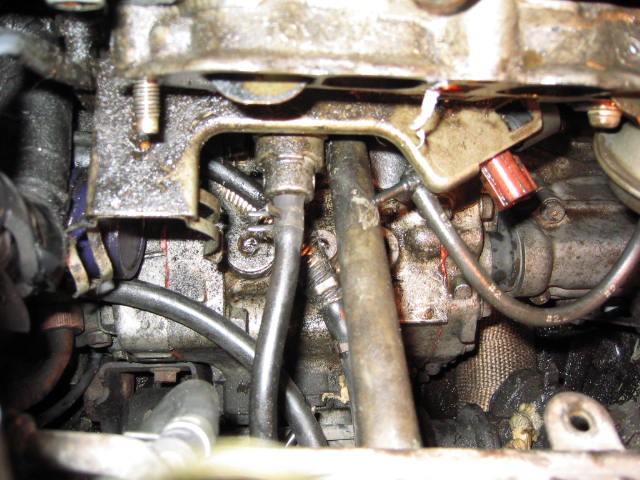 |
On the rhs underneath the manifold the TVIS and TVSV (Turbo VSV) are attached to the manifold via 2 bolts - remove this entire assembly - lugs shown on bottom rhs of this picture. Take careful note of the pipes and connections. Picture on the left difficult to understand but shows the TVIS plate and open butterfly valve. Below this is the TVIS and TVSV plate nicely covered in oil! |
| To remove the manifold simply slide back and off the studs, then remove the TVIS. Mark the manifold and TVIS plate so you won't get confused with their orientation. | |
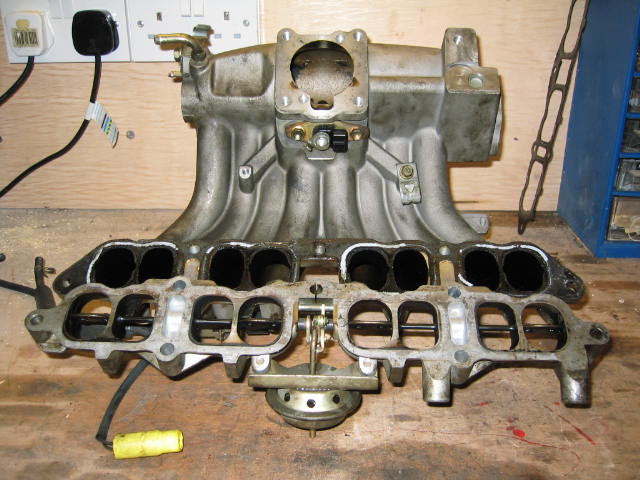 |
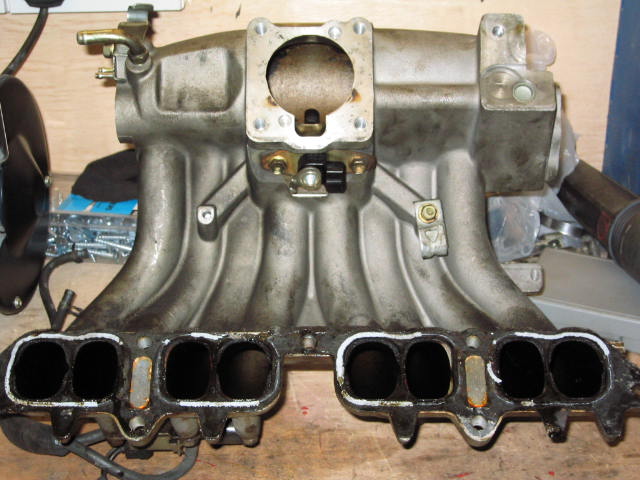
You can clearly see the two sections of the intake manifold. |
 |
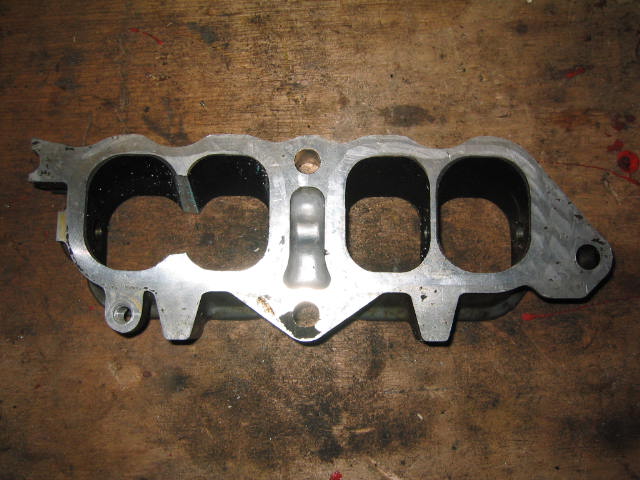
Be careful not to mark the manifold surfaces when removing the old gaskets. Run a sharp Stanley knife along the surface between the gasket and aluminium to remove. Note the white sealant residue which is already on your new Toyota gaskets |
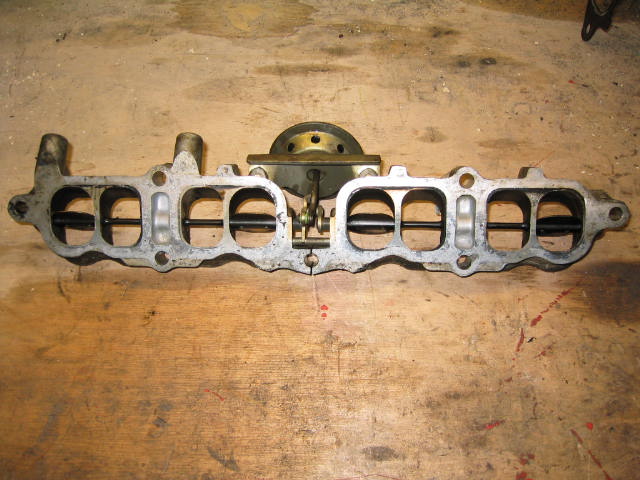 |
Note the large amount of crap within the TVIS unit. Note the amount of air restriction and air flow disturbance this imposes on both inlets to the head due to the butterfly valves and metal bar that passes through the entire assembly. |
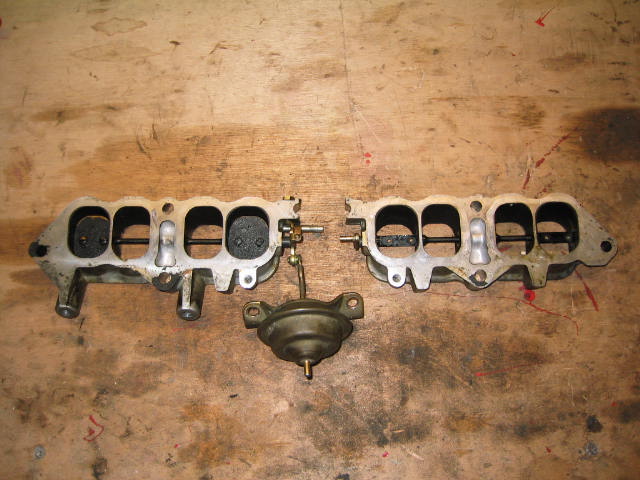 |
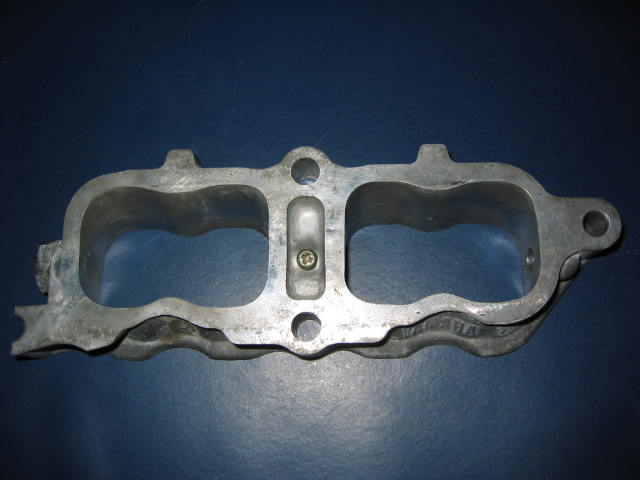
The TVIS assembly splits into two halves. On the lhs the picture clearly shows how two runners are blocked off by the TVIS butterfly valves and the lugs to accommodate the TVIS and TVSV mounting plate The rhs shows two removed butterfly valves. |
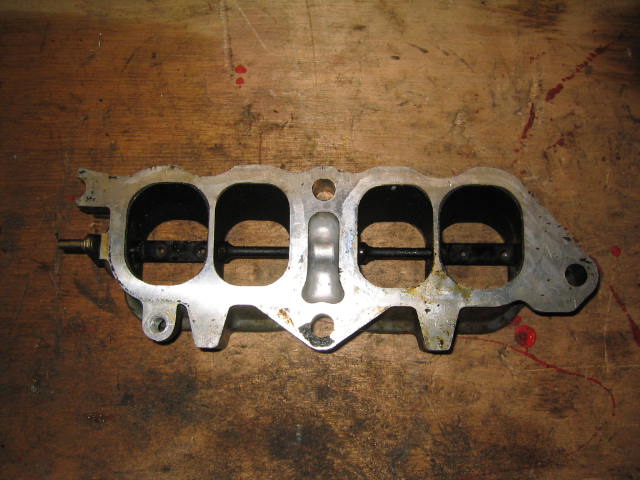 |
One half of TVIS assembly with the butterfly valves removed. These are secured via 2 screws, push down hard when unscrewing as the other end of the bolts are burred over. |
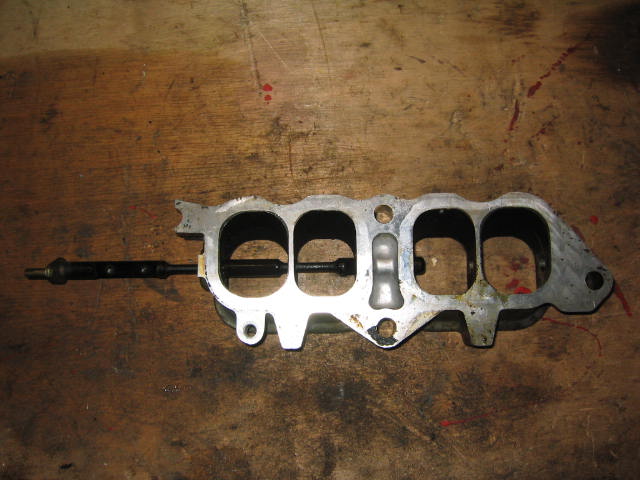 |
The butterfly mounting bar slides out of the assembly, but leaves a couple of holes which need to be plugged. If you don't plug them then the car will run very badly if at all. |
 |
With the internals removed the porting can begin. First cut away the runner dividers, (one shown removed here) with a hacksaw. |
| Take your new TVIS to head gasket and match the gasket to the head. You will notice this is not correctly aligned. Carefully cut away the excess material until the gasket is a perfect match to the head. | |
| The next step is a little laborious. Mark out the material to be removed on the head side of the TVIS plate by using your new freshly cut gasket. Take your Dremel or equivalent with coarse sanding drum and start machining away the excess aluminium. Note you are only roughly removing the material from the head side only. After all you have only matched up the head side... | |
| Take the manifold to TVIS gasket and offer this up to the manifold. As before with the head gasket, cut away and remove any excess material from the gasket that fouls the path of the air. | |
 |
Take the TVIS assembly, mark and remove the material from the manifold side. To complete the porting blend
either side of the assembly together and temporarily finish with a fine sanding drum and this should look similar to this. As that got a bit confusing - to summarise:
|
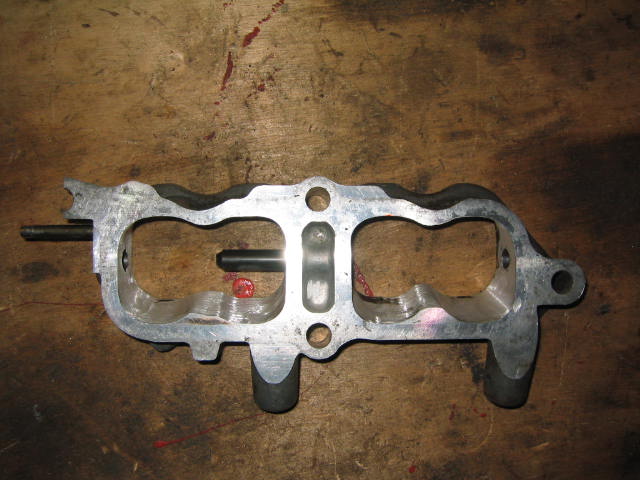 |
Next we need to plug those holes. Take the whole TVIS bar, (see above picture), cut the centre section away and insert into the central hole as shown. To secure this in place drill and tap a bolt into position, to ensure this doesn't move file a recess into the bar which the bolt will fit into. The other hole is at the end of the assembly where the TVIS actuator resides. Drill and tap in an M12 bolt complete with rubber seal. I also secured both these bolts with thread locking compound. |
| To complete the porting, smooth off the entire assembly with a fine sanding drum paying particular attention to the inserted portion of bar and the M12 bolt. Then I used 400 wet and dry to do a final polish. | |
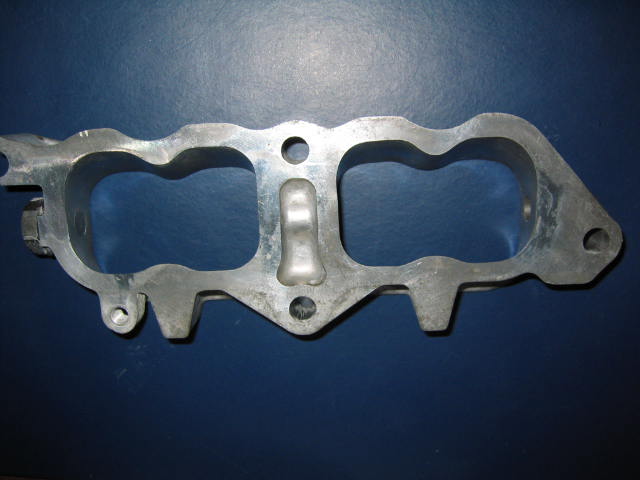 |
The finished article. Note the M12 bolt inserted into the left hand side and sanded down flush. |
 |
A clear view of the bar inserted between intake runners and the M12 bolt with rubber "washer". The hole at the far end isn't a hole and simply accommodates the end of the butterfly support bar. |
 |
The small bolt securing the bar between intake runners. |
| Just over half way there now! Next up is the intake manifold porting. | |
 |
Take the manifold to TVIS gasket and mark around the manifold flange. You can see by the blue marking that the TVIS plate is much larger than the manifold - you'll be surprised by how much they are misaligned. |
| Again, using your trusty Dremel begin opening out the runners until you are very close to your marking. Finish by opening out the port by using the fine drum and then wet and dry. It is important to note that you should keep checking the TVIS/manifold gasket to manifold to ensure you are still okay | |
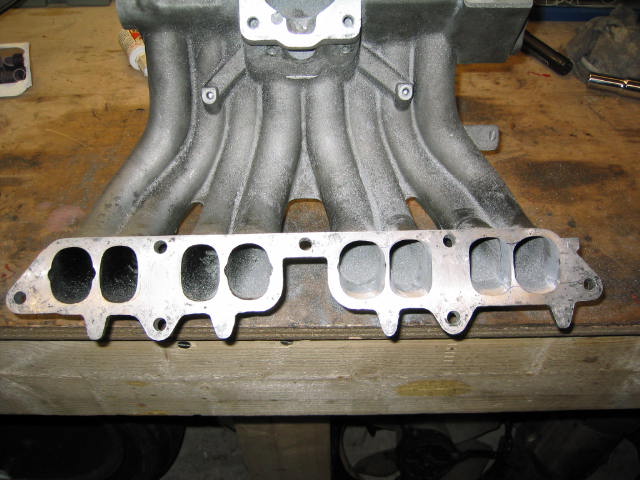 |
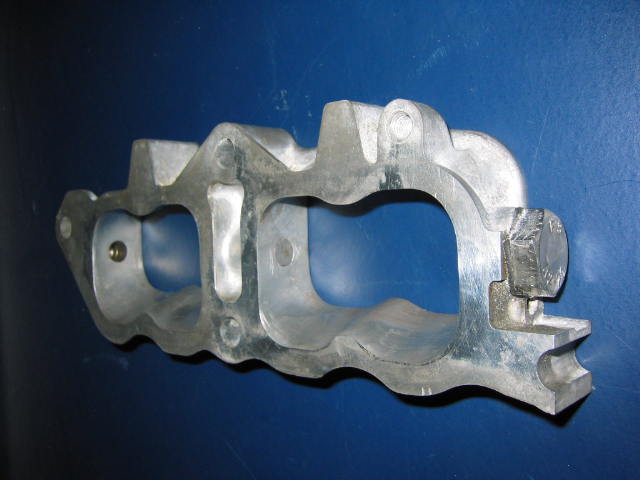
Here the rhs runners are nearly finished. You can clearly see the difference in size between the two sets of runners. Note the large amount of aluminium filings produced... |
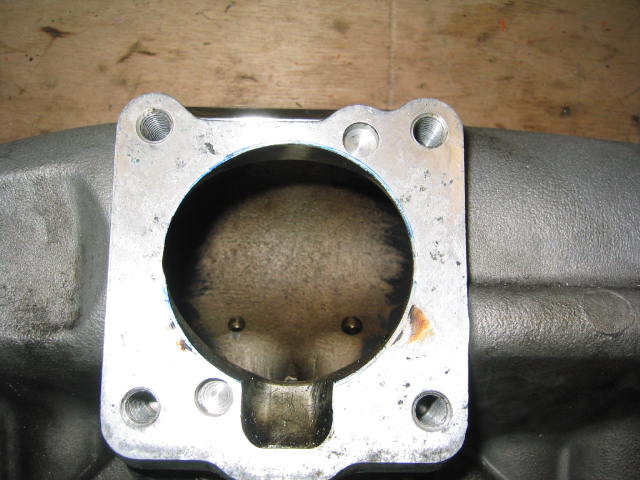 |
At this point you may also want to drill the right hand side blanking plugs to accept future connections for WI pressure switch etc...Also if you look at the throttle body to manifold area there are a few regions that can be improved upon - either enlarged or smoothed out. Removing these harsh/sharp edges and casting imperfections will aid air flow through the manifold. |
| Once all the porting is complete clean out the inside of the manifold very very thoroughly. Copious amount of water will be required. As you can see from the state of my manifold the runners were covered with oily deposits. This was a git to remove. I recommend a long flexible bottle brush and Mr Muscle oven cleaner, fairy liquid won't shift it! Using this method will remove the oil after a few washes/cleans. Note that when finished and everything is all dry then dry a white powdery residue will be left, (aluminium rust), simply run the bottle brush through and blow out. Check, double check and then check again everything has been cleaned out or it'll end in tears... | |
Prior to fitting the manifold back on check around the rear of the engine for:
|
|
| Now it is time to refit the intake, but before this, remove the FPR VSV from the rear of the manifold, do not leave this at the rear of the manifold, instead mount elsewhere. Why? This will be a lot easier to get at in the future and will also make reassembly easier. Check the other jobs to be done as well, especially the bypass throttle body coolant mod. | |
| Refitting is simply a reversal of removal! Checklist, (I think this is in the right order!):
|
|
| Start the car and thoroughly check for fuel and air leaks. Keep checking for a week cos they may take time to develop - mine did! |