165/185 Suspension Spring Replacement
** Applicable to the 165/185 only **
Why do I want to change the springs?
- To improve the handling and responsiveness of the car
- To make the car look better
- Replace the worn/rusty springs
- So you can do the other jobs at the same time
Things to know before you do the job
- Note the orientation of the rear springs, they are angled...
- You will have to take out some of the plastic trim in the boot to get at
the top of the rear suspension leg
- You will have to bleed all the brakes afterwards
- Fronts are easier to do than the rears
- The rears have a drop link which might not come undone
Where can I get uprated springs from?
Check out the
links section. I found the only place to get these from was
Fensport - about Ł100. The 20% uprated units are okay but if I was to do this again I would get the custom
specification and maybe 40%. Personally I wouldn't go lower on the ride height, as may have problems with slightly larger alloys/tyres and rubbing/bottoming out.
Why didn't you change the shocks?
They are very difficult to source. Fensport is your only option. The rears are sealed units and are expensive. Besides, I managed to pick
up a set of duff insert 185 Rallye shocks for not a lot - just need to source the inserts. The fronts?
KYB Have just started to
sell adjustable shocks for this car in the UK, (July 2003), and I reckon the "normal" shocks will be far too soft - going for the AGX adjustable unit part no 765015 should be excellent,
just need to buy them! I have heard that they are 5mm longer than the original shock, but KYB UK and their man in Japan have confirmed that these will fit.
Also KYB USA's website lists this shock for the 165 "Alltrac" i.e. GT4.
Fensport sell the KYB 365077 185 shock with adaptor to fit a 165.
Did you notice any improvement with the Fensport springs?
Definitely. The car was much firmer, even when fitted with the original 12
year old shocks that were knackered.
Were there any problems?
Yes!
- The anti roll bar nut/bolt may well give you grief. If you are heavy handed then you're going to round off the Allen head bolt and you will need a
new drop link. The guide should help you to get the little tinker undone
- Afterwards the front wheels occasionally touched the arches when bouncing around on uneven/crap roads with potholes. This was due to worn shocks
Tools
This article is mainly concerned with replacing the rear as these are harder to do. Be it the fronts or the rears the principles are the same.
|
To access the top of the suspension leg it is easiest to do the fronts first. Simply lift the bonnet and the 3 mounting nuts/bolts are right in front of you |
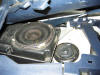 |
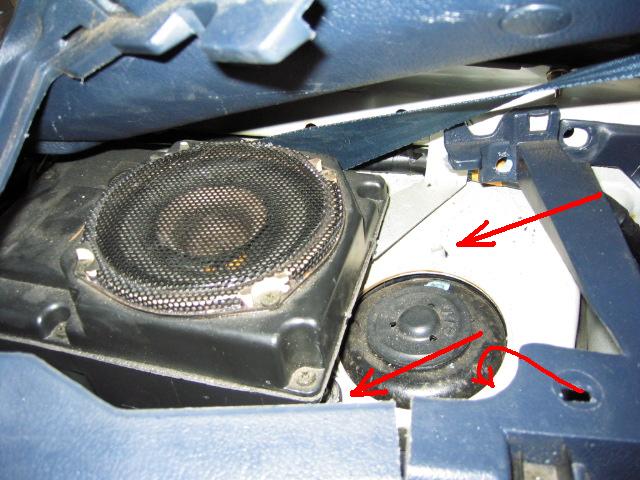
To access the top of the rears you will have to remove the side panels in the boot, a
couple of speaker nuts to allow access and the speaker covers - which simply pop off. As shown here. Undo the 3 nuts but leave one still on but
loose to prevent the shock from falling down onto your CV boot and splitting it! |
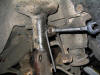 |
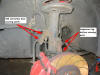
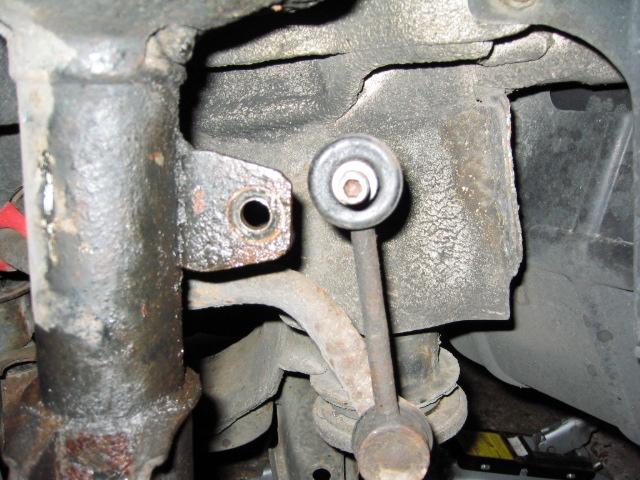
Next to remove is the anti roll bar link. This is a pain and has probably rusted solid. Wire brush the area and spray some penetrating oil on to the nut and bolt - go for a cuppa. Notice the Allen key inserted through the 14mm spanner. To undo this without having to buy a new drop link, keep the Allen key still and rotate the spanner. As you gingerly get the nut to move don't forget more penetrating oil and also turn the nut back once it starts to undo i.e. do up 1/2 turn. This is to clean the threads and break off any rubbish that had "welded" itself between the nut and bolt |
 |
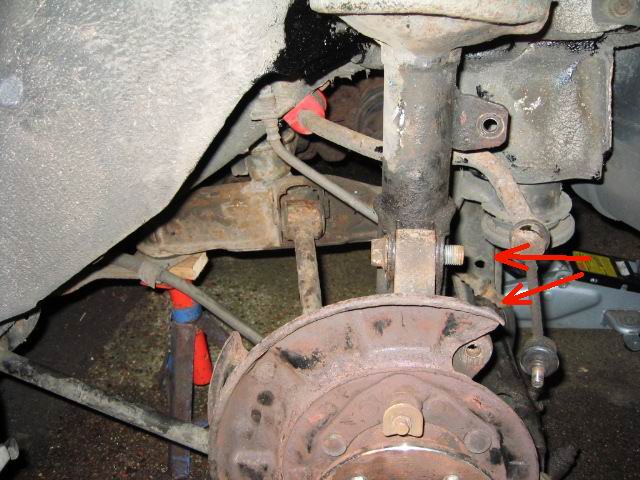
When it finally comes off it'll look something like this |
 |
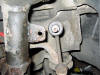
Next undo the 2 hub/shock nuts and bolts |
 |
Undo the brake hose mounting clip from the side of the shock. Undo the brake hose
to calliper bolt and pass the hose through the hole in the shock. Reconnect brake hose back up to the calliper to stop it leaking. If you don't stop it leaking eventually it will drain the master cylinder dry
and you'll have to bleed all the brakes very thoroughly! Also remove the ABS securing bolt. The picture shows the front strut... |
 |
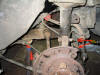
Before you remove the last bolt, cover the CV joint gaiter with a rug to help prevent accidental damage. Undo that last bolt you left at the top
of the suspension leg and "simply pull suspension leg free!" Watch out not to catch the CV boot or you'll be in for another job. On the left is a
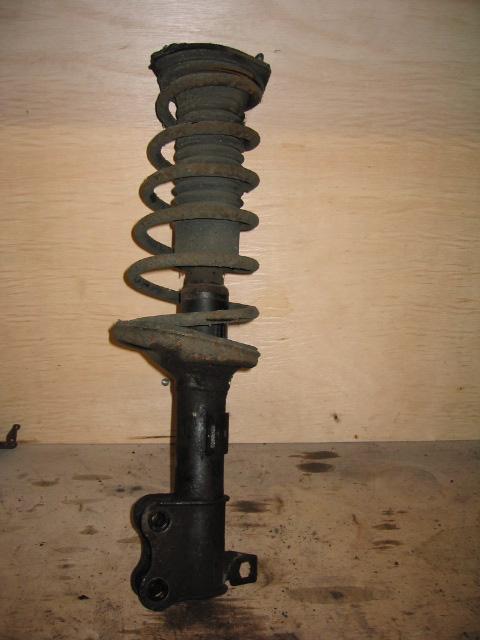
picture of the old rear suspension leg. Note do not
poke the bolt out with your finger, you might loose it if the strut/car moves! |
| |
Have a look at the end of the unit, there is a rubber grommet, take it out. Slightly
undo the nut, so as to break the joint/tension - approx 1/2 turn. Make a note of the orientation of the end cap otherwise it won't fit back into the car later! You'll have to undo it all again! |
 |
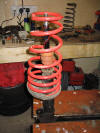
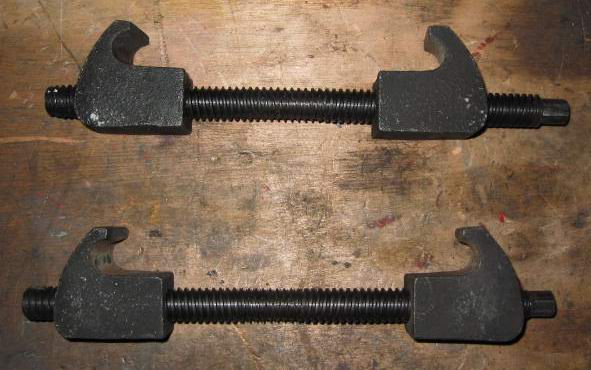
You are going to need a set of spring compressors.
Be very very careful at this stage, this is dangerous! Note that the spring compressors should be fitted at opposite sides of the spring and at approximately equal heights. The suspension leg should be firmly gripped
and pointed away from you/the car/the house. Gradually and evenly do up the compressors. Treat the unit with respect there will be a lot of pressure on the spring compressors. Do not stand in front of the tensioned
unit and wear eye protection |
| |
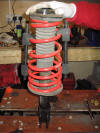
Keep equally nipping up the spring compressor nuts until the tension loosens on the top
plate. Inside the top plate is the shock nut. As you previously cracked this off this should be easy to undo. Remembering not to stand in the line of fire of the spring! |
| |
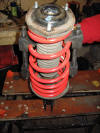
With the top plate removed start to slacken off/release the tension on the spring - on each side undoing the nuts an equal amount. When the compressors come loose job done. Time to take apart the rest |
 |
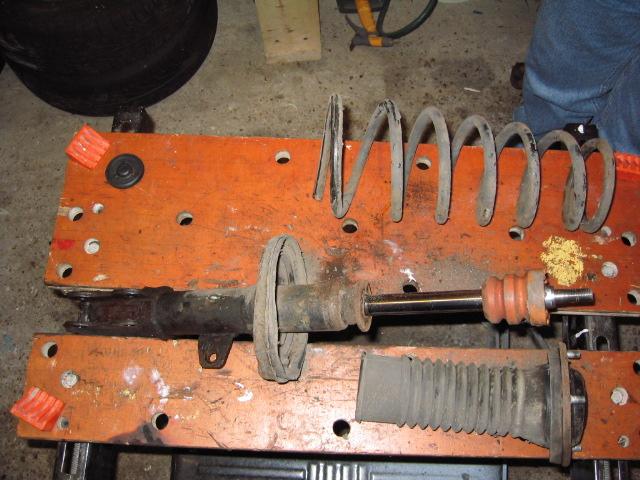
Picture shows removal of top plate and rubber boot - note spring compressors already removed |
 |
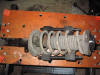
All the components of the rear suspension leg |
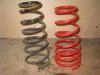 |
Comparison of the near and old springs. Note the height difference and also the progressive spring rate of the replacement spring, as well as the lack of rust on the new one |
 |
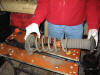
Reassembling the suspension leg with the bump stop and new spring fitted. Be careful to
align the new spring with the old marks in the rubber fittings on the shock. Examine the bottom mounting plate - make sure you fit the correct side spring to the correct shock! |
 |
Aligning the top cap to the correct place you noted when you took it off...You'll
notice that the underside of the top mount is keyed so that aligns with the top of the shock absorber as well |
 |
Top mount on, compress the spring again and put on the top nut. You'll have to release
the tension on the springs in order to torque up the nut - 49Nm |
|
Fitting is simply a reversal of removal! Not forgetting the Drop link of course - tighten to 35Nm and suspension leg to hub nuts and bolts - 255Nm |
|
Don't forget to bleed you brakes. If you "just" change both the rear shocks then you will have to bleed both the front brakes as well as the rears |
Any questions or comments then please feel free to e-mail me
Other jobs
- Replace the suspension bushes -
front
rear
- Cure the rust you have on the
suspension turrets
- Change the shocks -
front
- Replace the top suspension mount at the top of the suspension leg. You'll probably want to get a TRD one from Fensport as they as better and cheaper than a stock one from Toyota!
- Change your brake fluid
Safety
- Always chock the wheels so that the car cannot roll forwards or backwards. Always best to do this on a flat even surface
- Always wear the appropriate safety equipment
- Always use axle stands
- Suspension is a safety critical component. Ensure all components are correctly assembled and all nuts and bolts are correctly tightened
- Removal of the suspension springs with a spring compressor is a dangerous job. Be careful, point away from you/anyone else/the car/the house/pets. Clamp it so it can't go anywhere
Disclaimer
This article is intended as a helpful guide and shows how I replaced the suspension springs. If you are in any doubt, or not qualified, do not undertake this modification, consult a qualified mechanic. Alteration of suspension parts away from the manufacturers design is not recommended and undertaken at your own risk!
Top of page


